这™都有专利,服了...
这里说的嗅探器当然不是两条网线插到路由上然后监听桥接端口那种,而是完全不会被两端设备察觉的嗅探器。
前置条件:
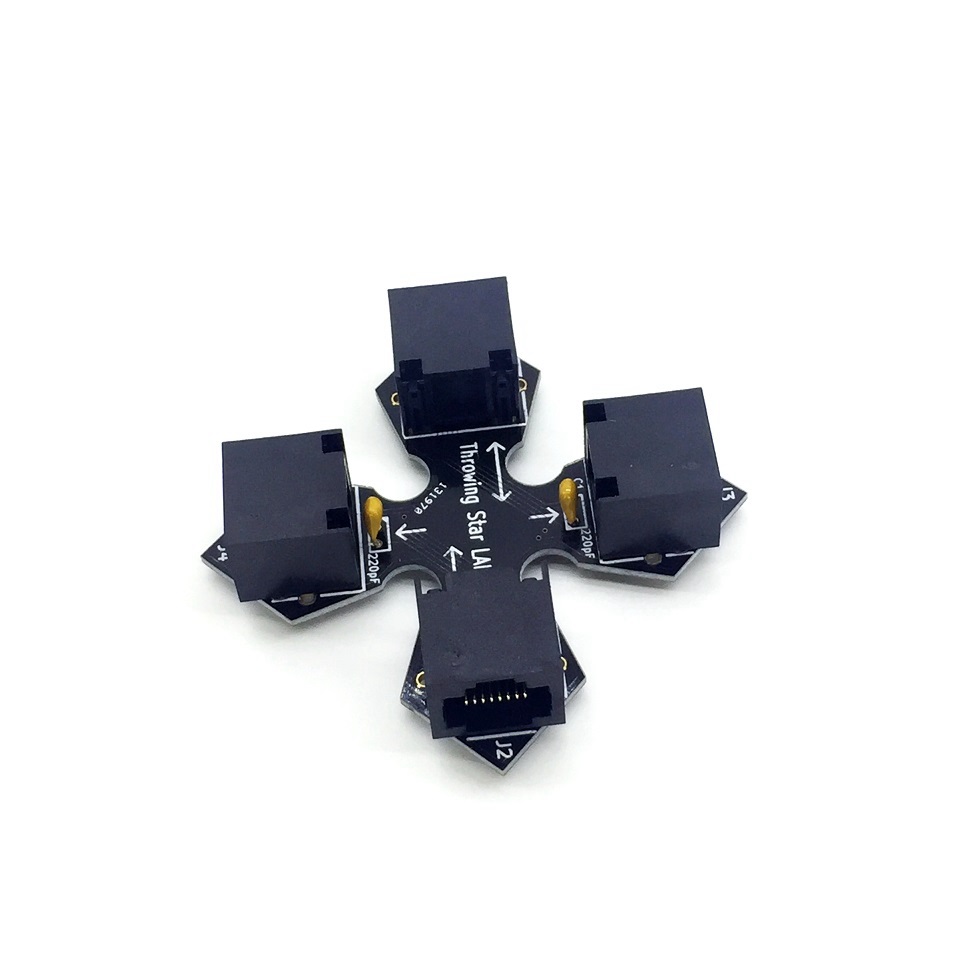
- 一个物理Network tap(tun/tap中的tap就是这个意思)。有网线工具可以自己做,或者参考Throwing Star LAN Tap自行设计PCB。x宝有卖,至于值不值就见仁见智了(
- 网线运行在
100BASE-T及以下速率,如果是千兆网请自行限制端口速率或者找根4芯网线( - 一个OpenWRT路由器,至少有两个以太网口及一个任意类型的网口。
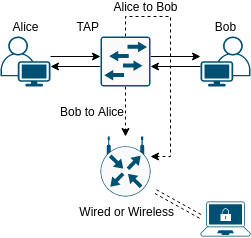
网络拓扑:
OpenWRT设置方法:
- 安装
tcpdump,及按需安装其他包; - 设置访问用接口(通过有线或无线),同时开放防火墙;
如果是无线路由配电池的话就完全不用另外拉线了...
- 连接tap,双箭头的连接两端主机,单箭头的连接路由器;
- 为每个接受监听数据的交换机端口分别单独创建vlan,如图:
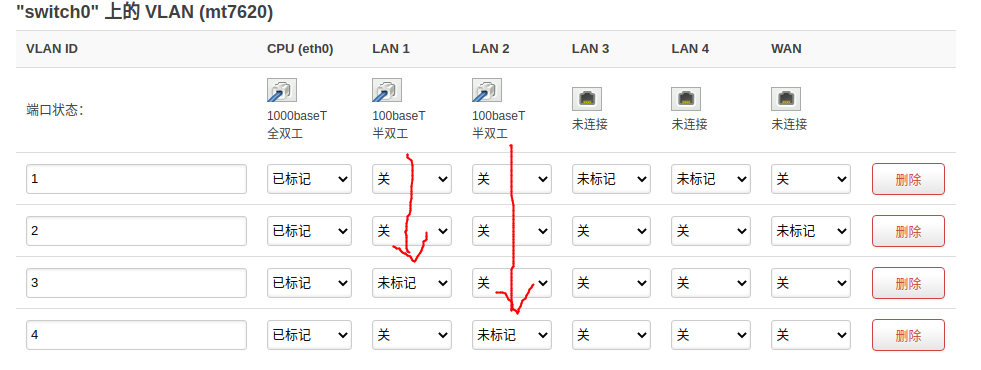
可以看到监听端口已经进入了半双工模式
这是为了绕过交换芯片内部的mac学习机制,如果交换机只看到一个端口来包,自然没法猜测哪个端口下才是目标机器(
- 新建网络接口(如
mon),将刚创建好的两个vlan桥接:

名字最好要短,原因嘛...
这样两个单向的监听就能合成双向的结果
- 测试
tcpdump -i br-mon -n not port 22,应该就可以看到监听数据了!
这时再配置电脑wireshark实时显示(参考此处):
mkfifo /tmp/sniffer避免使用pipe时,重启
tcpdump就会重启wireshark的问题wireshark -k -i /tmp/sniffer &ssh root@<host> 'tcpdump -s0 -U -n -w- -i br-mon not port 22' > /tmp/sniffer-s 0instructstcpdumpto set the snapshot length of data from each packet to the default value of262144bytes.
-USince the-woption is not specified, make the printed packet outputpacket-buffered. Which means that it will print the description of the contents of each packet without waiting for the output buffer to get full.
-nDoes not convert host addresses to names. This can be used to avoid DNS lookups.
-w -Write the raw packets toStandard Outputrather than parsing them.
-i br-monDefines which interface to listen on. We wanted the loopback interface to listen to everything.
not port 22Since we usedsshto start this command, we do not want to listen to the data that we produce as well and flood the inputs.
bks臭车